
In our infrastructure we manage mainly Linux hosts, but there are also a few Windows servers that meet clients’ requirements. The best way to manage cloud infrastructure is by automation, using Puppet or Ansible for example. Unfortunately, it is only effective with a vast amount of hosts with similar features.
We decided to manage all Windows hosts manually because in this case automation processes (Puppet, Ansible) would be more time consuming. This post will explain how to easily set up performance monitoring. In this case we use WMI Exporter + Prometheus + Grafana.
WMI Exporter
First, we need to export metrics from the hosts. Therefore install WMI exporter using MsiExec installer. Do the same for every Windows host that you want to monitor. Download an exporter and install it with a small change of enabled collectors via command line:
msiexec /i C:\wmi_exporter-0.5.0-amd64.msi ENABLED_COLLECTORS="cpu,cs,logical_disk,os,net,system"This will install an exporter with export relevant metrics on default port 9182. After this, you can verify it from the host using url: localhost:9182.
Example of exported data from a host:
wmi_cpu_interrupts_total{core="6"} 8.77379197e+08
wmi_cpu_interrupts_total{core="7"} 9.2799066e+08
# HELP wmi_cpu_time_total Time that processor spent in different modes (idle, user, system, ...)
# TYPE wmi_cpu_time_total gauge
wmi_cpu_time_total{core="0",mode="dpc"} 4205.671875
wmi_cpu_time_total{core="0",mode="idle"} 584128.5019883
wmi_cpu_time_total{core="0",mode="interrupt"} 91.484375
wmi_cpu_time_total{core="0",mode="privileged"} 14112.125
wmi_cpu_time_total{core="0",mode="user"} 13645.78125
wmi_cpu_time_total{core="1",mode="dpc"} 1215.5625
wmi_cpu_time_total{core="1",mode="idle"} 533297.5368586
wmi_cpu_time_total{core="1",mode="interrupt"} 577.84375
wmi_cpu_time_total{core="1",mode="privileged"} 10069.5625
wmi_cpu_time_total{core="1",mode="user"} 11265.28125
Prometheus
A well-known monitoring tool Prometheus will ensure the collection of the metrics from Win hosts while offering a good query ability with PromQL. Prometheus app will be running on a separate host, but this time on Ubuntu Xenial :).
The installation is easy, the internet is full of good-quality tutorials, just search for them and do it. Relevant to us is the setup of Prometheus to collect data from a Windows host, which is done through a config file:
global:
  scrape_interval:     15s# take data from host every 15s

# config for host: for every target need to define job_name and #IP:port
scrape_configs:
  # win server1
  - job_name: 'app_win1'
    static_configs:
  - targets: ['10.0.2.10:9182']

  # win server2
  - job_name: 'app_win2'
    static_configs:
  - targets: ['10.0.2.11:9182']

  # win server3
  - job_name: 'app_win3'
    static_configs:
  - targets: ['10.0.2.12:9182']
Grafana
It is useful and nice to show collected data in graphs. This feature is provided by Grafana – an Open-source platform for analytics and monitoring. It can run on a separate host but will share a host with Prometheus in this case. Again, it is very easy to set up and connect with Prometheus.
Installation from the official site.
After that, for the first login use httplocalhost:3000/ form Grafana host. Next, it is necessary to add a data source. In the left panel: Configuration -> Data Sources -> Add data source Then choose Type Prometheus, set IP and port => Save and Test
Cool, now the last thing to do is to create a dashboard with some graphs: Left panel -> Create dashboard -> Graph. Set the data source to a new one and choose the data you want to be shown using PromQL.
In this scenario, a graph for CPU usage will be created. Every host requires one query. It is a bit longer, but it shows us the average CPU usage in the last 30 seconds in %:
100 - (avg by (instance) (rate(wmi_cpu_time_total{job="app_win1",mode="idle"}[30s])) * 100)
100 - (avg by (instance) (rate(wmi_cpu_time_total{job="app_win2",mode="idle"}[30s])) * 100)
100 - (avg by (instance) (rate(wmi_cpu_time_total{job="app_win3",mode="idle"}[30s])) * 100)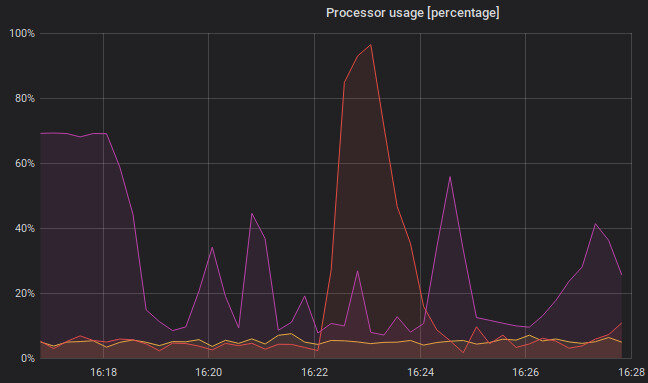
This monitoring stack offers a very easy-to-setup, complex monitoring tool. This is only a demonstration, if you are interested in more, do not be afraid to play with it.